
Windows 11 and 10 offers less UI control over the updating behavior of the operating system than previous versions of Windows , There is no option to turn off Windows Updates using the Control Panel or Settings app in Windows 11 & 10, it checks for updates automatically and install any updates they find, whether you like it or not. This new feature is actually pretty convenient for most users. If you want control over the update process you can disable the Windows Update service . This requires that you open the Services manager, locate the service and change its startup parameter and status. You would then have to enable the service again whenever you want the operating system to check for updates (It does not look so easy).
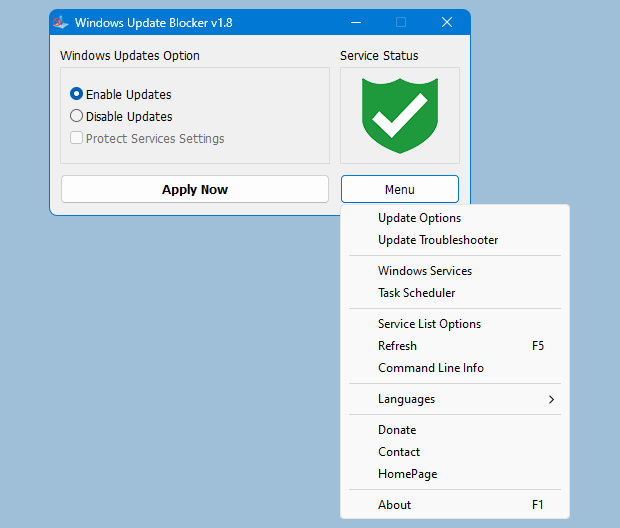
Windows Update Blocker is a freeware that helps you to completely disable or enable Automatic Updates on your Windows system , with just a click of the button . This utility is portable, which means that you are no longer required to go through the installation process and no leftovers will remain on the HDD after its removal. if you place the program file to an external data device, you make it possible to take Windows Update Blocker everywhere with you and use it on any computer you come in contact with, who has things configured just right, and doesn’t want to take the chance that an update might mess up their system. This utility is for that person.
How it works
After downloading, extract Windows Update Blocker to your desired location, then run it
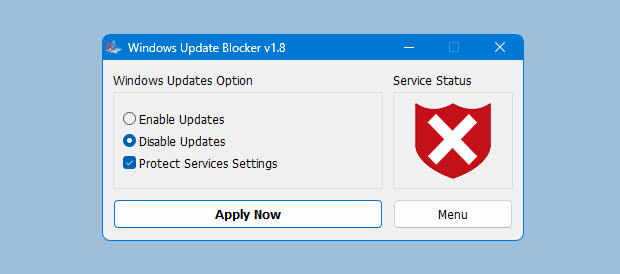
service status icon will show your windows Update service status , if you want to block Automatic Windows Updates Choose “Disable Service” And click “Apply Now” Button , Protect service setings can prevent Uncontrolled change (Recommended).
How to block any other service and protect the settings
Windows Update Blocker New version allow users to add any other service into Wub.ini file to block it , first please edit Wub.ini file and add your desired service name under the “dosvc=2,4” line , for example if you want to block “Windows Update medic Service” Please open services and find it

then click on it and copy the Service Name
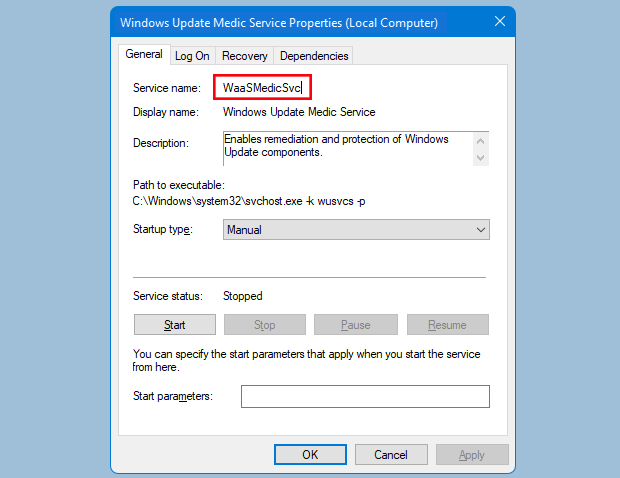
Write or paste the service name under the dosvc=2,4 line
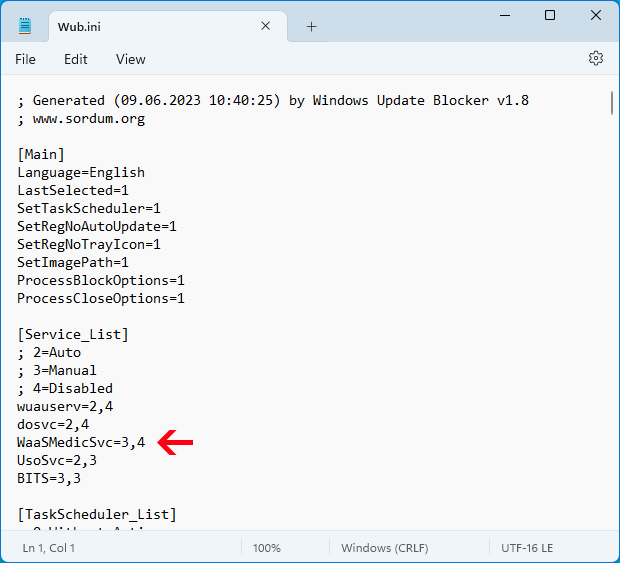
Finally open Windows Update Blocker and use “Apply now” button. If you want to delete recently added service after a while please follow these steps:
1. Open Windows Update Blocker and choose enable service option then use Apply now button.
2. Delete your desired service line from the Wub.ini file
3. Now you can choose disable service and Protect service settings options
Service List Options
Under Menu button there is a “Service List Options” choice if you click it , Service List Options popup window will be open. With this GUI you can easily control services which added to Wub.ini [Service_List] section. You can add Maximum 25 service to Wub.ini. Wuausrv service showing only for informational purposes therefore you can not edit it.
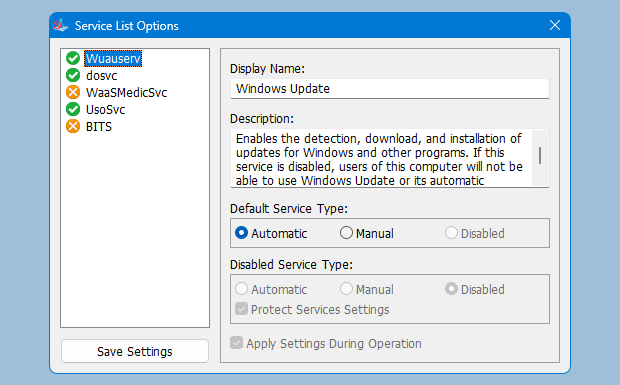
NOTE: If the windows update service doesn’t start or if there is a problem even though you have enabled windows updates, please restart your system and try again. When windows updates are turned off, some windows processes or programs may try to open and repair Windows updates, resulting in windows update being damaged. Please use the Windows Update Troubleshooter from Microsoft if the updates do not open after restarting the system.
Windows Update Blocker supports Command line options to automate Windows Update Blocker tasks :
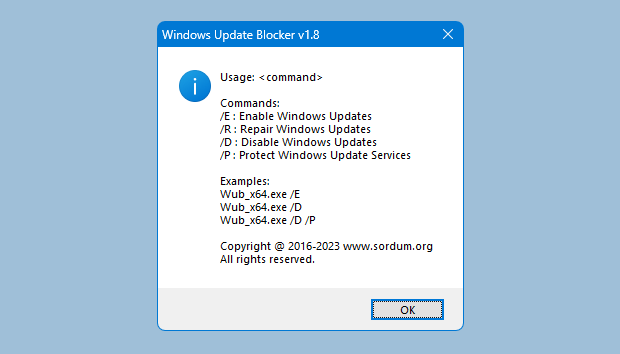
NOTE: Wub software does not block Microsoft defender updates.
Supported operating systems: Windows 11 , Windows 10, Windows 8.1 , Windows 8 , Windows 7 , Windows Vista ,Windows XP (32\64-bit).
Supported languages: English , Turkish , German , Hebrew , Slovenian , French , Russian , Portuguese , Italian , Polish , Spanish , Czech , Ukrainian , Greek , Hungarian , Chinese Simplified , Chinese Traditional , Portuguese (brasil) , Thai , Arabic , Korean , Vietnamese , Japanese , Indonesian , Persian , Swedish , Thai , Georgian , Danish (Dansk), Albanian, Azerbaijani, Bulgarian, Serbian , Uzbek , Tajik , Abkhazian , Romanian , Slovak , Sinhalese, Macedonian , Croatian , Lithuanian ,Turkmen , Dutch (Nederland) , Dutch (Didier)
File: Wub_x64.exe │ Virustotal
MD5: 9d6778f7f274f7ecd4e7e875a7268b64
SHA1: 452fa439f1cc0b9fcc37cf4b8cfff96e8cc348aa
File: Wub.exe │ Virustotal
MD5: 82aff8883099cf75462057c4e47e88ac
SHA1: 68e2939f59b3869e9bd3ecc4aca3947649631bf8


you’re welcome , We have coded it for us and will try to keep it working
Fantastic job, thank you very much !!
Do you think it will work forever?
How can i will know if a new version will be available?
I have windows 10 pro lite v. 1511 ( 32 bit ) and WUB 1.1 works perfectly for now and i hope forever !! 🙂 Thanks a lot !!!
Do you believe any modifications will be needed to WUB 1.1 to avoid the new Windows 10 update (1809) scheduled to be released in October. Currently my INI file has only the disabled default setting of dosvc=2,4. I am on 1709 and want to stay there for the time being. Thank you.
thank you very much, I couldn’t believe if it could have worked
Yes it works
Hi,
Does it work for windows 10 home?
The ‘problem’ is that the white cross on red shield is present AND simultaneously on the left side of the window the line ‘disable service’ is activated (black dot [radio button] present). For me it would more logical to have -in this situation- the radio button present on the line : Enable service. It is a detail of course. Thanks for your free tools!!
thanks!
Service status OFF
Stupid question: when I see the white cross on a red shield, is the service update On or Off ?
Can someone kindly look at my edited test wub ini file that I will be using and let me know if I did it correctly. I do not want to screw it up. For space reasons I have trimmed the languages though when I use the edited version I will just put them all back just for continuity.
1. So I just copy the contents of the wub.ini file to a text file and then save it when I am done editing with the .ini file type. Correct?
2.@Kokkat – So I am going to be “borrowing” Kokkat’s list. Thank you.
3. In the untouched wub.ini file it says dosvc=2,4 and nothing below it however when Kokkat did his he included at the end of his additions the Service name: “DoSvc” and Display name: “Delivery Optimization” for all of his edits. Is this how it is done. Include the Service Name and the Display Name?
4. Can anyone confirm what @Kokkat just wrote that osrss and UsoSvc settings do not seem to be working.
5. So mine is going to look just like Kokkat’s below. Is this correct? Thank you:
; Generated (06.05.2018 21:26:12) by Windows Update Blocker v1.1
; Web Link …
[Main]
Language=Auto
SetRegNoAutoUpdate=1
BlockServiceSetting=1
[Service_List]
; 2=Auto
; 3=Manual
; 4=Disabled
dosvc=2,4
WaaSMedicSvc=3,4
UsoSvc=3,4
wuauserv=3,4
osrss=3,4
BITS=3,4
Service name: “DoSvc”
Display name: “Delivery Optimization”
Service name: “WaaSMedicSvc”
Display name: “Windows Update Medic Service”
Service name: “UsoSvc”
Display name: “Update Orchestrator Service”
Service name: “wuauserv”
Display name: “Windows Update”
Service name: “osrss”
Display name: “Windows 10 Update Facilitation Service”
Service name: “BITS
Display name: “Background Intelligent Transfer Service”
想彻底禁用Windows Defender应该怎么设置呀
@elle You list the Windows Services by their name (e.g. Service name: “UsoSvc”) which you want to set the status of. You enter them one per line under “[Service_List]” in Wub.ini
My earlier posts goes in more detail on this.
Working great so far. Thank you. Is there a way to auto get notices when Windows Update Blocker v1.1 gets updated to Windows Update Blocker v1.2? or do I need to just keep checking this page. Also I am a bit confused about one of the above posts where @Kokkat references a “Service List.” Is there a Service List for dummies ie. what it means and does? TIA.
Just reporting something I noticed. Very thankful for the tool nonetheless.
Disabled but still running (Stop button is grayed out), even after cold boot:
Service name: “osrss”
Display name: “Windows 10 Update Facilitation Service”
Disabled but runs on every boot (I can stop it manually though):
Service name: “UsoSvc”
Display name: “Update Orchestrator Service”
A big thanks goes out to Velociraptor and the Sordum team for this safe and indispensable little tool.
Now let’s see the Service List of y’all. Here, I’ll go first
[Service_List]
; 2=Auto
; 3=Manual
; 4=Disabled
dosvc=2,4
WaaSMedicSvc=3,4
UsoSvc=3,4
wuauserv=3,4
osrss=3,4
BITS=3,4
Service name: “DoSvc”
Display name: “Delivery Optimization”
Service name: “WaaSMedicSvc”
Display name: “Windows Update Medic Service”
Service name: “UsoSvc”
Display name: “Update Orchestrator Service”
Service name: “wuauserv”
Display name: “Windows Update”
Service name: “osrss”
Display name: “Windows 10 Update Facilitation Service”
Service name: “BITS
Display name: “Background Intelligent Transfer Service”
example for Wub.ini:
“WaaSMedicSvc=3,4”
The first number symbolizes the status of the particular service (in this case WaaSMedicSvc) when the Windows Update Service is enabled via WUB. Here the first number is 3, so the WaaSMedicSvc Service’s “Startup type” will be set to Manual (3=Manual).
The second number symbolizes the status of the particular service (in this case WaaSMedicSvc) when the Windows Update Service is disabled via WUB. Here the second number is 4, so the WaaSMedicSvc Service’s “Startup type” will be set to Disabled (4=Disabled).
Note: 2=Auto ; 3=Manual ; 4=Disabled