- Dns Jumper v2.1 Main Features
- See Your Current DNS servers in Dns Jumper
- How to Change or Use Custom DNS Server Settings
- How to add a custom DNS server
- Get info about preferred and alternate DNS
- Backup or restore Dns settings
- Choose a Dns Group
- Find the fastest DNS
- Add or delete a DNS server
- Add or delete a DNS server Group
- Changing the Dns list order
- Starting DNS jumper on system startup
- Run the fastest Dns test at startup and apply it Automatically
- Dns Jumper’s Cmd parameters
- Add Your own Languge (create a translation)
- Version History
Find fastest DNS

1. Click the “Fastest DNS” button
2. Click the “Start DNS Test” button
DNS Jumper will find the fastest DNS IPs and mark them (green) and will automatically sort the IPs based on speed.
3. The fastest DNS server will be auto-selected and you can click “Apply DNS Server” in the bottom right of the window to apply it. Right click any DNS entry to see a context menu which offers options to Apply DNS, mark or unmark all DNS, get information on the selected DNS, or use the DNS Group feature.
If you have a long list of DNS servers and want to find the resolve times, you can use the Turbo Resolve feature. It will drastically reduce the total test time.
Note: The Fastest DNS feature only works for IPv4
Add or delete a DNS or DNS group
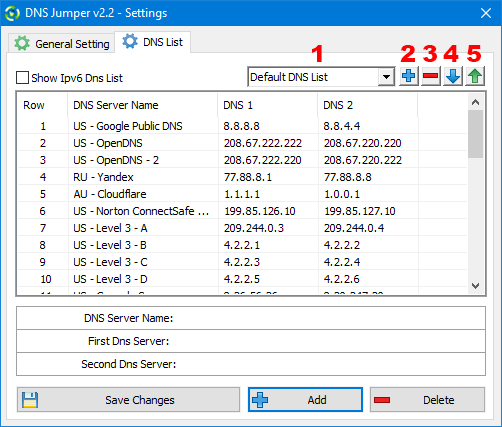
Add or delete a DNS server: Click the “DNS Options” button (gear icon) (1)

The settings page will open to the DNS List tab. You can now edit the default DNS server list, or choose another from the drop-down list (1). From here you can add or delete a server from the list, change its name, or its IP address. When making changes you will need to click the “Save Changes” button to apply them.

Add or delete a DNS server Group: There are two methods for adding or deleting a group.
a) via the user interface : Click the Add (blue plus sign) button (2) and type in a name for your group. This will open a new blank DNS server list, to which you can manually add your own servers. You can delete a group by using the Delete (red minus sign) button (3)
b) via the DNSJumper.ini: To avoid problems, close DNS Jumper before editing the .ini. Right-click the dnsjumper.ini file and select “open with Notepad”.

and Add your new IPv4 or IPv6 group

1. Ipv4 or IPv6
2. Group Name
3. Location
4. DNS Name
5. Preffered DNS
6. Alternate DNS
7. True=included in fastest DNS test, false=not included in the test

To delete a DNS group, select it and delete it. The same goes for IPv6.
Changing Dns list order

You can easily reorder your DNS Server list with drag and drop. As shown in the screenshot above, to move “US-OpenDNS-2” down the list, left click it and drag it to its new position and release.
Start DNS jumper on system startup

To have DNS Jumper auto-start with Windows, Click the “DNS Options” button (blue gear) then select the “General Settings” tab. Near the bottom, tick the box next to “Start DNS Jumper on system startup”
Run fastest Dns test at startup and apply it Automatically
In the same General Settings area, tick the box next to “Apply following parameters at system startup”, and in the text field below that type in “/T default” (without quotes). You can also apply other settings at startup using the correct parameters. Click the light bulb icon to the far right for more information regarding parameters.
Dns Jumper’s Cmd parameters

In a command prompt, running “dnsjumper.exe /?” (no quotes) will list all available parameters. See also the screenshot above.
Adding Your Own Language

In the main DNS Jumper window, click the Options button on the bottom left, then select “Languages –> Translate”


It is in our notes. We will probably add it to the new version, Thanks.
Please add secure DNS (DoH) section in Windows 11.
@Luis Gonzalez
Cleanbrowsing DNS is located in the Family & Safe group!
Web Link …