Dns Jumper Help page

- Dns Jumper v2.1 Main Features
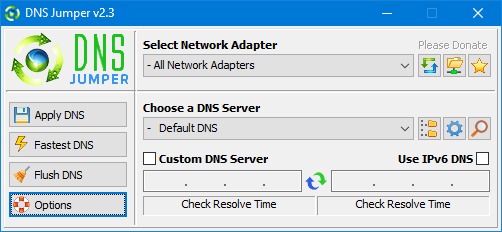
- See Your Current DNS servers in Dns Jumper
- How to Change or Use Custom DNS Server Settings
- How to add a custom DNS server
- Get info about preferred and alternate DNS
- Backup or restore Dns settings
- Choose a Dns Group
- Find the fastest DNS
- Add or delete a DNS server
- Add or delete a DNS server Group
- Changing the Dns list order
- Starting DNS jumper on system startup
- Run the fastest Dns test at startup and apply it Automatically
- Dns Jumper’s Cmd parameters
- Add Your own Languge (create a translation)
- Version History
Dns Jumper v2.2 Main Features:
– Quickly and easily change your IPv4 and IPv6 DNS settings
– See your selected network card’s current DNS IP address.
– Easily backup and restore your current DNS settings.
– Check your DNS server response time.
– Automated checking of all listed DNS response times, finding the fastest available. You can then quickly apply it to your DNS settings.
– Add your own custom DNS server.
– CMD (command line) support
– Clear/Flush the DNS cache
– Add your own language (Use Options > Languages > Translate feature)
See Current DNS on Dns Jumper:

1. Shows your current DNS server’s name
2. Shows your current DNS IP addresses (preferred and alternate)
For IPv6 tick the IPv6 checkbox
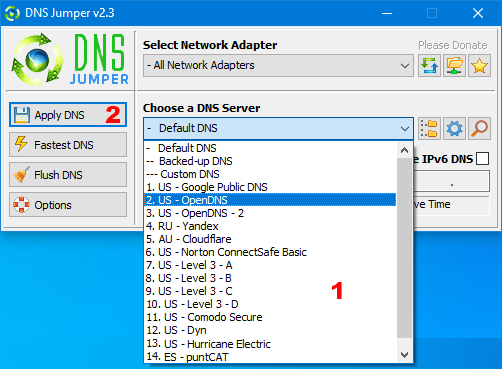
How to Change or Use Custom DNS Server Settings in Windows:
There are two ways to do this , Option 1: Use the the DNS Jumper main interface:

a. Under ‘choose a DNS Server’, select a server from the drop-down menu.
b. Click the ‘Apply DNS’ button
Option 2: Right-click the system tray icon and select one of the preferred servers

How To Add a Custom DNS Server

Easily add a custom DNS server by first ticking the ‘Custom DNS server’ box, and then type (or paste) in the IP address you wish to add. Do the same for the alternate IP address. Then click the ‘Apply DNS’ button.
Find Information About the Preferred and Alternate DNS

The “magnifying glass” button on the far right of the main window opens a menu that allows you to get information about your current DNS server, or to copy the IP numbers to the clipboard.
Backup or Restore DNS Settings

The first time you run DNS Jumper, it automatically backs up your current network card’s DNS settings. To back up the settings manually, click “Quick Configuration” (the ‘star’ button) and then select ‘Backup DNS’.
There are two ways to restore your settings back to your ISP’s defaults.
1. click the “Quick Configuration” button (the star) and click “Default DNS”
2. Under “Choose a DNS Server”, open the drop down menu and select “Restore” or “Default”, and then click the “Apply DNS” button
Note: For IPv6, tick the IPv6 checkbox
Choose a Dns Group
DNS Jumper features 3 pre-set lists of servers to choose from. Aside from the Default list, you might also wish to see a list of Family Safe servers. These can help protect your children from inappropriate websites (including pornographic). You can improve security by selecting the ‘Secure DNS List’.

1. Click the “DNS Group” icon (looks like two small folders) and select your desired server list
2. Click the ‘Choose a DNS Server’ drop down menu and select a DNS server from the list
3. Click the ‘Apply DNS’ button on the left


With Pink WhatsApp, you can enjoy enhanced customization, but when it comes to improving internet speed and security, DNS Jumper is a must-have tool. It simplifies switching DNS servers, helping you access blocked sites, boost browsing speed, and enhance online safety.
Gg
It would be great if you could add DNS over HTTPS. When I change it now, it sets it to unencrypted.
(HTTPS üzerinden DNS özelliği eklerseniz çok iyi olur. Şuan değiştirince şifresiz olarak ayarlıyor.)
This app is on the verge of greatness—it just needs an update to support DNS Watch’s IPv6!
It’s great, an easy way to bypass censorship or geoblocking. Especially if you live in a country run by a totalitarian regime.
It may also speed up access to certain websites or certain games, you need to choose a good DNS server.
It would be great if you could change DNS based on URL or browser tab.
(URL bazlı veya tarayıcı sekme bazlı dns değiştirme yaparsanız süper olur.)
Seems to be working again, no idea what caused this glitch, probably something in Windows, as it has worked faithfully for years. Thanks for a great program, I use it frequently.
I’ve used this excellent program for years without issue, now it freezes when I try to apply a dns server. The flush dns works, but if i apply any dns server I have to end the app in task manager.
My IP address was showing in the USA. I used this program. Google Chrome returned to normal. But in Opera and Yandex browsers, it still shows in the USA.
What is the reason for this? I would be glad if you could help me.
(Benim ıp adresi abd de gösteriyordu. Bu programı kullandım. google chrome, normale döndü. Ama opera ve yandex tarayıcılarında, hala ABD’ de gösteriyor.
Bunun nedeni nedir ? Yardımcı olursanız sevinirim.)
thanks you
Just above the comments.
Web Link …
You can also access the download links of all programs from the download link in the lower right corner.
bro wheres the download button
brooo wheres the download button?
Best.dnd
This is great for accessing blocked websites like Tubi, Pluto TV, Freevee, etc.
wifi4games